Quick start
This guide aims to get you up-and-running with Brail quickly, while briefly going over the core concepts. To jump right in, check out the starter project, instead.
In this guide, we will use next.js as our underlying framework
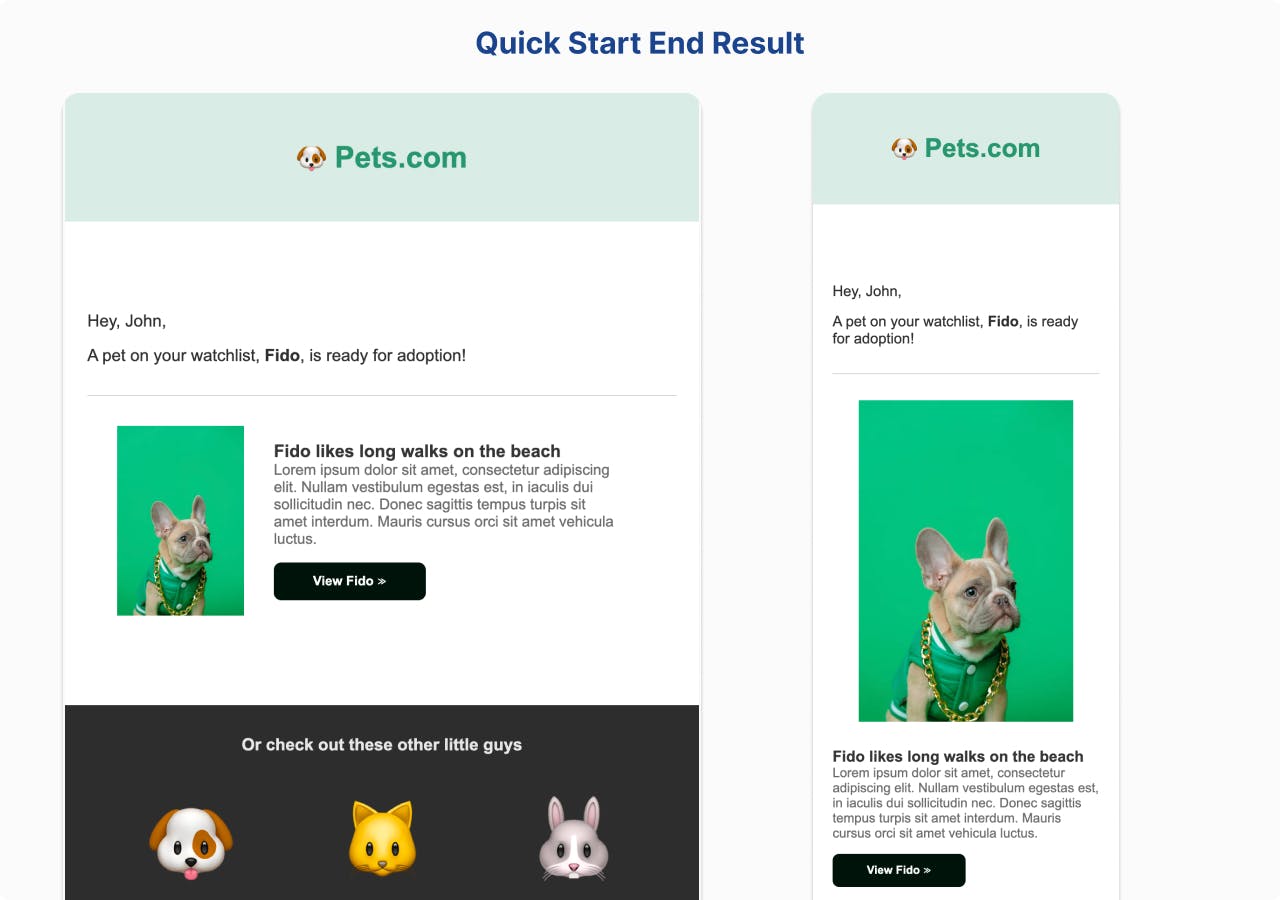
We will end up with a template looking something like this:
Setup Next.js
First, we need to setup a next.js project.
pnpm create next-appInstall Brail
With Next.js installed, we can now install Brail.
pnpm add brail @brail/reactUsage
Crafting a Template
Create base template (optional)
First, we can group together common functionality into a reusable template base.
/* 📄 lib/brail.ts */
import Brail from "@brail/react"
import z from "zod" /** 👈 May need to install this */

const b = Brail.init()

export const baseTemplate = b.template
	.meta(z.object({ to: z.string(), subject: z.string(), }))
	.onSend((args) => {
		// Add any sending logic here
		// args.meta == the meta object defined above
		// args.html == the rendered html
	})
Specify props
Now, we can reuse this "base" template which will reuse our meta and onSend with any other templates that extend from it.
Click to see imports
import { baseTemplate } from "./lib/brail";
import z from "zod";
import {
    Email,
    Container,
    Row,
    Column,
    Typography,
    Button,
    Image,
} from "@brail/react";
import Link from "next/link";

const IMAGE_URL = "..."
const UNSUBSCRIBE_LINK = "...F"
/* 📄 pages/notification.tsx */
export default baseTemplate
.props(
z.object({ firstName: z.string(), pet: z.string() })
) /* 👈 Define props meta */
.preview({
firstName: "John",
pet: "Fido",
}) /* 👈 Define props used in preview */
/* To be continued... */Create template view
  /* ...continued */
  .view(props => {
		return <Email fontFamily="Arial">
        {/* BRANDING */}
        <Container py={48} backgroundColor="#d9ede6">
          <Row>
            <Column>
              <Typography
                as="h1"
                fontSize={32}
                color="#289770"
                textAlign="center"
              >
                🐶 Pets.com
              </Typography>
            </Column>
          </Row>
        </Container>
		{/* 👇 See full snippet in accordion below */}
📄
Show full template code
Show full template code
import { baseTemplate } from "../lib/brail";
import z from "zod";
import {
    Email,
    Container,
    Row,
    Column,
    Typography,
    Button,
    Image,
} from "@brail/react";
import Link from "next/link";

const IMAGE_URL = "...";
const UNSUBSCRIBE_LINK = "...F";

export default baseTemplate
    .props(
        z.object({ firstName: z.string(), pet: z.string() })
    ) /* 👈 Define props meta */
    .preview({
        firstName: "John",
        pet: "Fido",
    }) /* 👈 Define props used in preview */
    /* To be continued... */
    .view((props) => {
        return (
            <Email fontFamily="Arial">
                {/* BRANDING */}
                <Container py={48} backgroundColor="#d9ede6">
                    <Row>
                        <Column>
                            <Typography
                                as="h1"
                                fontSize={32}
                                color="#289770"
                                textAlign="center"
                            >
                                🐶 Pets.com
                            </Typography>
                        </Column>
                    </Row>
                </Container>

                {/* MAIN BODY */}
                <Container
                    px={24}
                    py={64}
                    backgroundColor="white"
                    color="#303030"
                >
                    {/* GREETING */}
                    <Row py={32}>
                        <Column>
                            <Typography as="p" fontSize={18} mb={16}>
                                Hey, {props.firstName},
                            </Typography>
                            <Typography fontSize={18}>
                                A pet on your watchlist, <b>{props.pet}</b>, is
                                ready for adoption!
                            </Typography>
                        </Column>
                    </Row>

                    {/* PET INFO */}
                    <Row borderTop="1px solid #d0d0d0">
                        <Column align="left" width={200} p={32}>
                            <Image src={IMAGE_URL} />
                        </Column>
                        <Column align="left" verticalAlign="middle">
                            <Typography color="#353535" as="h3">
                                {props.pet} likes long walks on the beach
                            </Typography>
                            <Typography color="#6c6c6c">
                                Lorem ipsum dolor sit amet, consectetur
                                adipiscing elit. Nullam vestibulum egestas est,
                                in iaculis dui sollicitudin nec. Donec sagittis
                                tempus turpis sit amet interdum. Mauris cursus
                                orci sit amet vehicula luctus.
                            </Typography>
                            <Button
                                href="https://pets.com/fido"
                                px={42}
                                py={12}
                                backgroundColor="#00120b"
                                color="#fdfffe"
                                borderRadius={8}
                                fontWeight="bold"
                                fontSize={14}
                                mt={16}
                            >
                                View {props.pet} ≫
                            </Button>
                        </Column>
                    </Row>
                </Container>

                {/* RECOMMENDATIONS SECTION */}
                <Container backgroundColor={"#2d2d2d"} p={32}>
                    <Row>
                        <Column>
                            <Typography
                                textAlign="center"
                                color="#e6e6e6"
                                fontSize={18}
                                fontWeight="bold"
                            >
                                Or check out these other little guys
                            </Typography>
                            <Row py={32} stackDirection="reverse">
                                {["🐶", "🐱", "🐰"].map((emoji) => {
                                    return (
                                        <Column key={emoji} align="center">
                                            <Typography fontSize={92}>
                                                {emoji}
                                            </Typography>
                                        </Column>
                                    );
                                })}
                            </Row>
                        </Column>
                    </Row>
                </Container>

                {/* Footer */}
                <Container p={64} color="#686868">
                    <Row pb={16}>
                        <Column align="center">
                            <Link href={UNSUBSCRIBE_LINK}>
                                <Typography textDecoration="underline">
                                    Unsubscribe
                                </Typography>
                            </Link>
                        </Column>
                    </Row>
                    <Row>
                        <Column align="center">
                            <Typography>©️ pets.com</Typography>
                        </Column>
                    </Row>
                </Container>
            </Email>
        );
});Great. Now we have a template that can be turned into email-safe HTML and sent to a user.
Rendering a Template Directly
The simplest way to use our template is to render it directly.
const props = { firstName: "John", pet: "Spot" };

const html = await notificationTemplate.render(props);

// Or send directly
await notificationTemplate.send({
    data: props,
    meta: { to: "john@doe.com", subject: "New pet just dropped!" },
});
Sometimes calling templates directly is sufficient. But if we need more flexible usage, we can easily expose our templates via an API so other services, like a separate web backend.
Creating and Serving a tRPC API
/* 📄 lib/trpc.ts */
import { createTrpcRouter } from "brail/trpc";
import notification from "../pages/notification";
import { initTRPC } from "@trpc/server"; /** 👈 You may need to install this */

export const appRouter = createTrpcRouter({
    templates: { notification },
    t: initTRPC.create({}),
});
export type AppRouter = typeof appRouter;
/* 📄 pages/api/trpc/[trpc].ts */
import { createNextApiHandler } from "@trpc/server/adapters/next";
export default createNextApiHandler({
router: appRouter,
});Calling the tRPC API
Now we can simply call our tRPC server from another service.
import { createTRPCProxyClient, httpBatchLink } from '@trpc/client'; /** 👈 You may need to install this */
import type { AppRouter } from 'lib/trpc.ts';

const client = createTRPCProxyClient<AppRouter>({
  links: [
    httpBatchLink({
      url: 'http://localhost:3000/trpc',
    }),
  ],
});

// These methods are fully typed
client.notification.send.mutate({/**  */})
client.notification.html.query({/**  */})
Brail offers more ways to use templates. Check them out.